Points Requests
Website (design for participants)
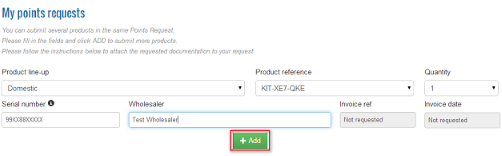
Below is an example of the Points Request form for users. Note that it is a sample only, the final design is subject to the parameters setup in the Admin Area.
 |
NEW! Visual and functional improvements were recently introduced in the Request Form to improve usability:
- the form is easier to fill in
- the file picker is more user friendly
- users are able to select product quantity without attaching [x] times the same documentation
- ... and much more...
|
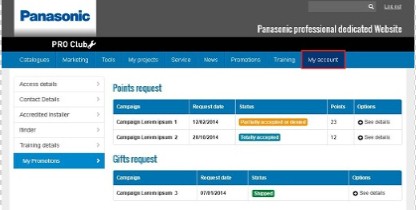
Participants can access their history of participation(s) in two different ways:
- Promotions > select the corresponding promotion > My points requests
- going to My Account > My Promotions (history of all entries combined)
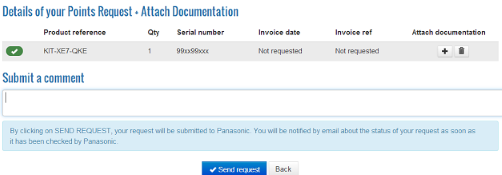
Participants also can access to the details of their points request by clicking on 'See details'.
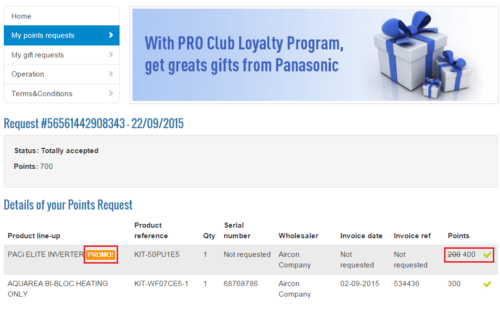
NEW! Accepted points requests made during a Push Period are highlighted by the sign

and points appear multiplied by the corresponding amount (of the Push Period).
Administration in Admin Area
In Loyalty Program > Points Requests, the main page is an overview of the most recent requests received for a specific campaign, with selected key-information.
At any time, make you sure you are in the right campaign taking a quick look at the green frame in the upper part of the screen (see screenshot).
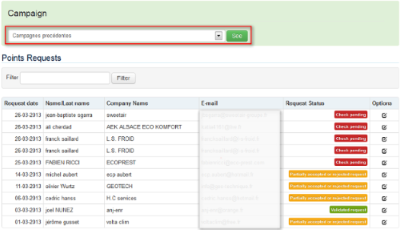
In the column “Request Status”, you can see the different states of a points’ request:
- Check Pending
- Validated Request
- Partially accepted or rejected request (which means that a follow-up of this request is necessary)
- You are notified by a small box if a participant sends a new comment about his/her request.
By clicking the icon  , you access to the details of the points’ request.
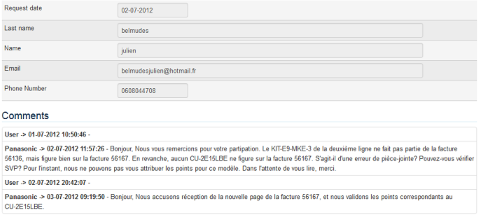
The information displayed about a request corresponds to the information/documentation previously defined by Key user in the Admin Area:
- Date of Request
- Participant's basic contact details
- Comments from the participant or the keyuser
- Products included in the request, displayed together with optional fields initially defined by Key user
- Documentation provided, initially defined by Key user (Invoice, Picture of installation...)
.png)
Push Period NEW!
If the points requested were from a product marked as 'Push Up Period' in the Admin zone ('Participating Products'), the points will appear multiplied by the amount selected by the keyuser (x2, x3, x4...) for the Push Period. All the points requests belonging to a Push Period will be highlighted by the sign
. Keyusers will be able to change the amount of points at their convenience.
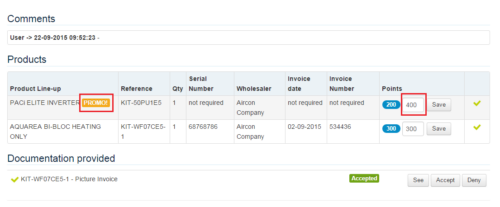
The steps to take in order to process a request are as follows:
- Check the information provided by the participant in the section “Products”
- Check each file attached, by clicking on the button“See”
- Accept or Deny individually each piece of documentation
Important: All documents must be accepted/denied in order to process a points’ request.
After checking all the information, you can:
- add a comment for the participant regarding his/her points’ request
- (if needed), modify the quantity of points allocated for each product (once all documents related to this product are accepted)
- process the request: As soon as you click on “Process”, the participant receives a notification by email.
Modify Points Allocation: The respective pieces of documentation can be distinguished individually at a glance (  accepted,
  denied)
For the accepted lines of request (), the amount of points allocated can be modified manually, if necessary (by default, the value is the one allocated in “Participating products”).
To modify the points to be allocated, introduce the value and click “Save” like in the following example 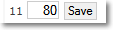
11 correspond to the quantity of points set by default. 80 is the value that you decide to allocate.
When a request is processed, the participant can perform different actions:
- For fully accepted requests: send comments (if he does not agree with the amount of points assigned for example)
- For partially accepted or denied requests: modify attached documents and/or write comments to Panasonic